This post will explain from scratch how to install MediaWiki on a DigitalOcean droplet, including how to set up Wikipedia-style navigation bars. It’s something I needed to do for a project I’m working on in a volunteer capacity and I had a tough time finding resources so decided to write up a detailed explanation myself. Here I’m assuming you’re using MacOS or Unix (i.e. some OS with a Unix-based terminal).
- Start up a DigitalOcean droplet
- Install the LAMP stack
- Install MediaWiki
- Edit LocalSettings.php to allow file uploads and change the logo
- Installing and copying relevant extensions and pages
1. Start up a DigitalOcean droplet
DigitalOcean is a fantastic provider of VPC (virtual private cloud) services; it’s basically a simplified version of AWS which has some great entry-level options for prototyping projects and playing with web services. We’re going to use a very basic droplet for this tutorial: the 512MB RAM, single CPU option, which is enough for prototyping. Anything more serious and you’ll need to scale up the droplet, which is very easy to do later. Notice we’re picking Ubuntu 14.04.5 x64 as our OS.
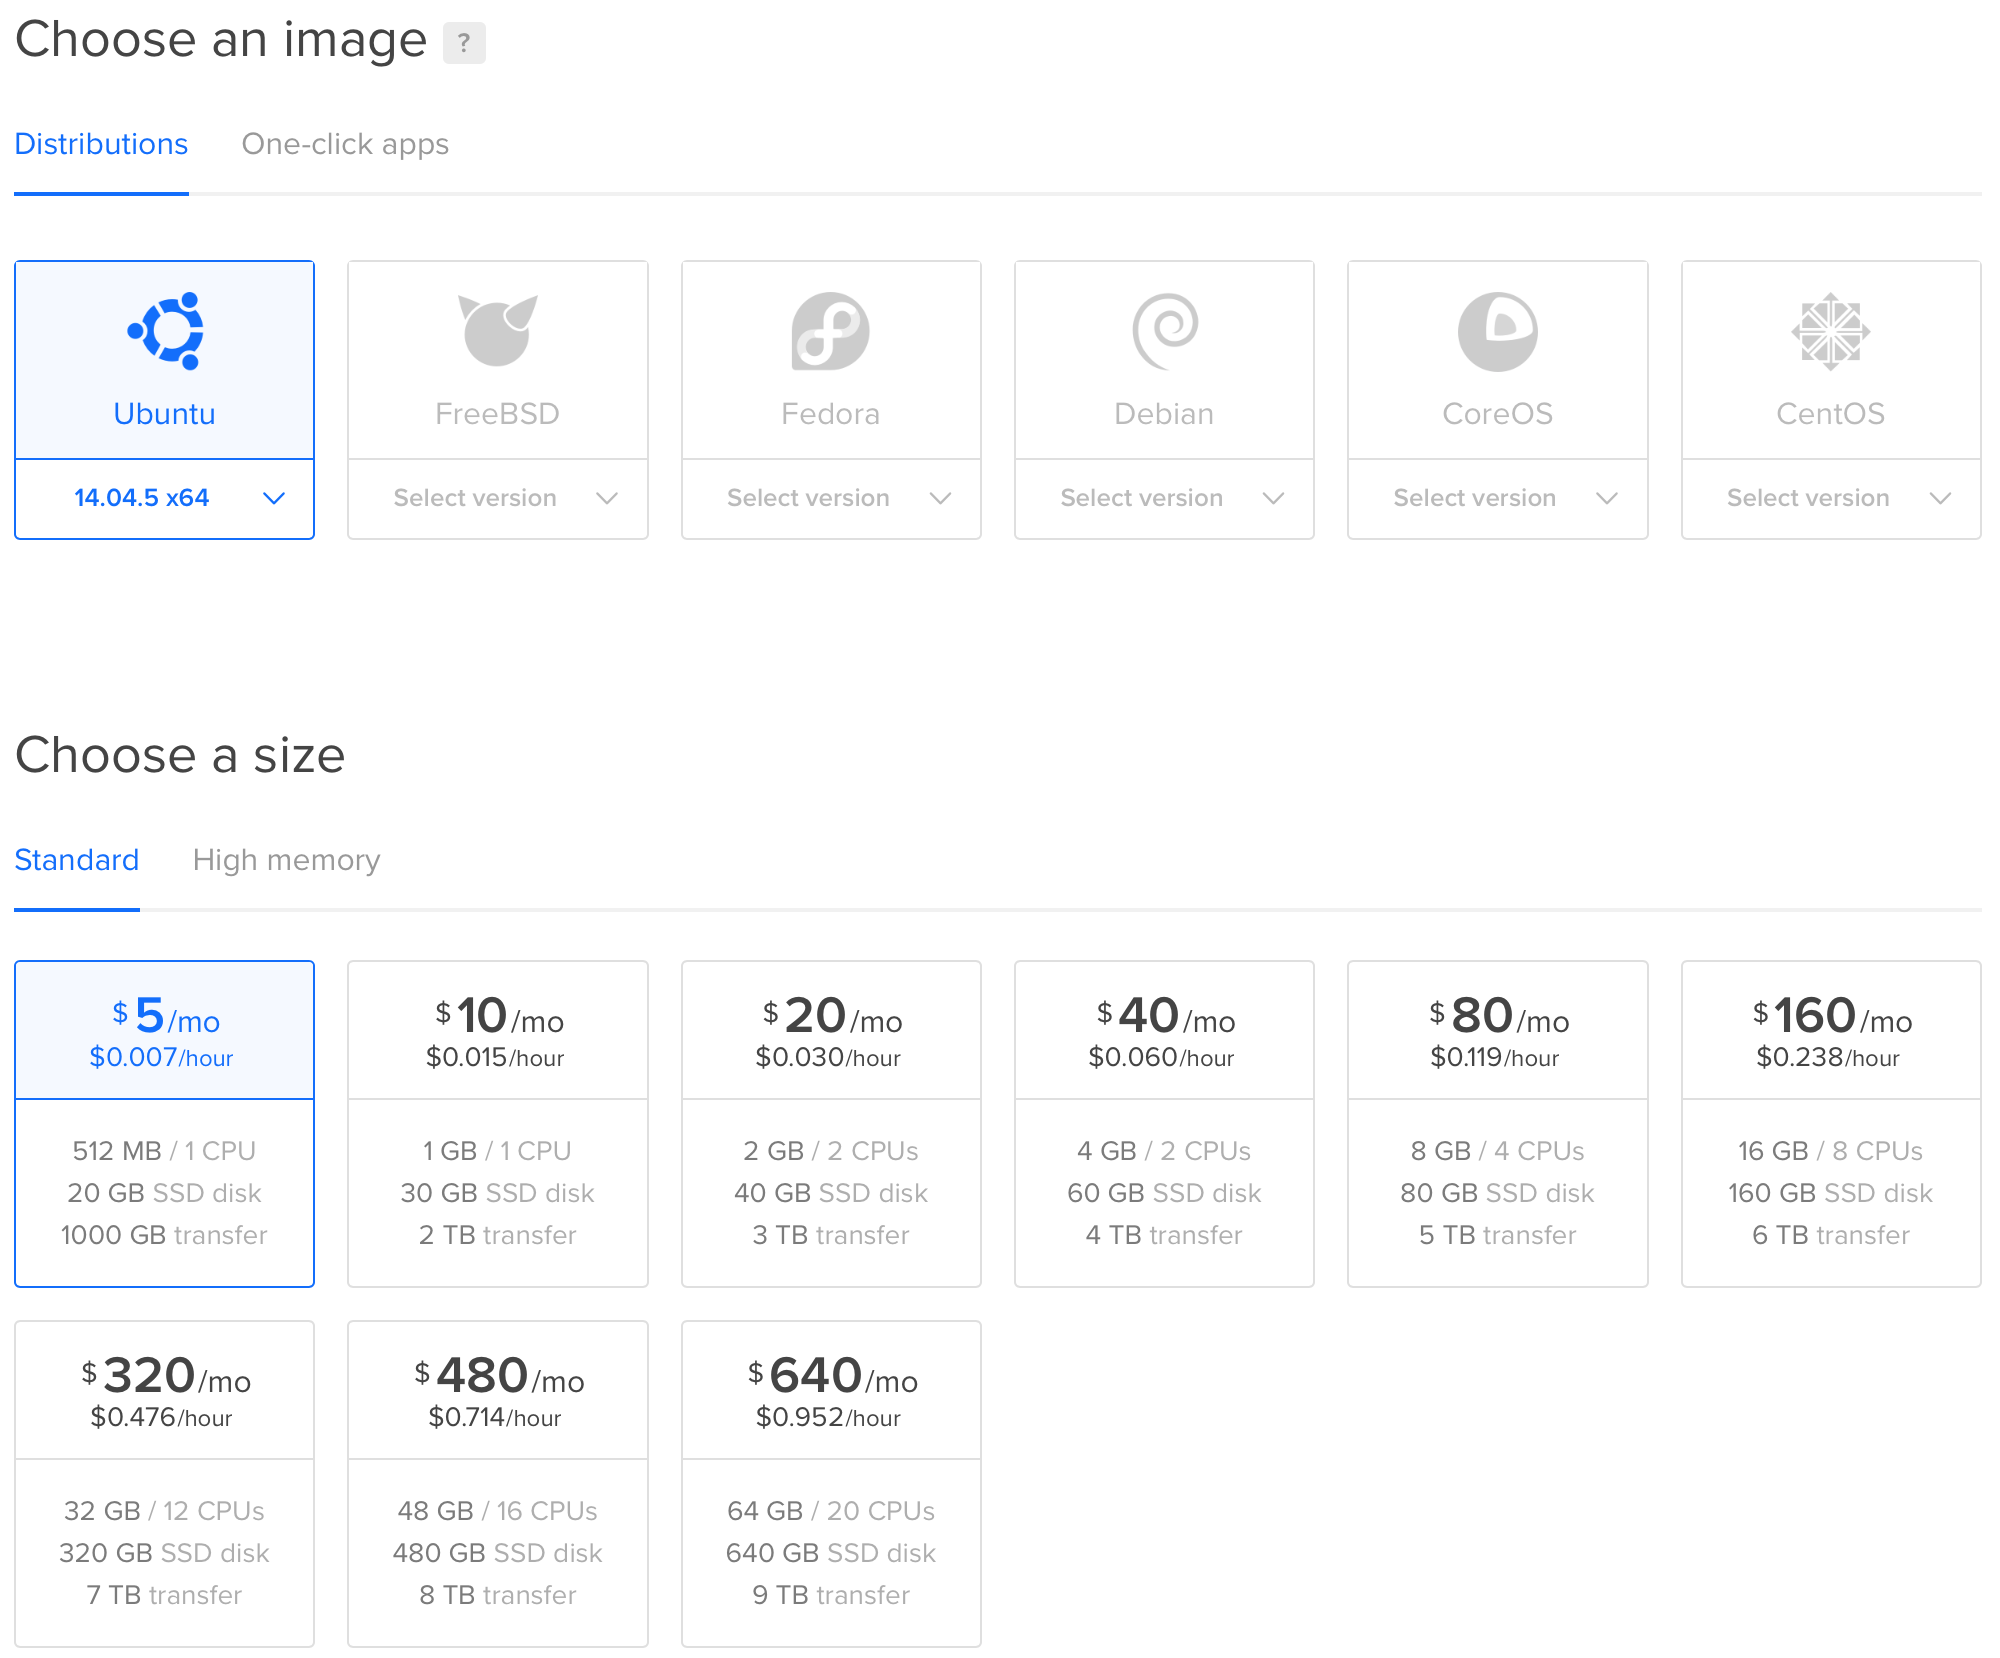
You don’t need to add an SSH key (unless you’re really worried about security on your wiki), and you should choose whichever datacenter region is relevant to you. Click Create droplet and you should see the instance spinning up in your list:

DigitalOcean have just sent you an email with the root password to your instance: so go to your terminal and
ssh root@XXX.XXX.XXX.XXX
where the XXXs represent the IP of your new instance. You’ll need to type / copy the password from the email, and be prompted to change passwords.
2. Install the LAMP stack
Now you’re inside your new instance, we need to install the prerequisite software for Mediawiki. LAMP is a name for a commonly used open-source software stack (Linux, the operating system, Apache, the webserver, MySQL, the database layer, and PHP, the dynamic layer).
I don’t need to provide many instructions here, as this tutorial from DigitalOcean provides fantastic step-by-step instructions on how to install everything. You only need to get to the “Install PHP modules” section; this and everything after is optional.
After completing this tutorial, you need to run a few more commands to get ready for Mediawiki:
sudo apt-get install php5-intl
sudo apt-get install php5-gd
sudo apt-get install php5-xcache
sudo service apache2 restart
3. Install MediaWiki
Now we need to download MediaWiki from source:
wget https://releases.wikimedia.org/mediawiki/1.27/mediawiki-1.27.1.tar.gz
Once the download has finished, extract it
tar xvzf mediawiki-*.tar.gz
and move it to the web server document root folder:
sudo mv mediawiki-1.27.1/* /var/www/html
Now we need to set up a MySQL database for the Wiki to use. Log into MySQL (which you installed in Step 2) with mysql -u root -p and type your password.
You’ll need to run a few commands here to set up permissions on the database for the wiki.
CREATE DATABASE my_wiki;
GRANT INDEX, CREATE, SELECT, INSERT, UPDATE, DELETE, ALTER, LOCK TABLES ON my_wiki.* TO 'wikiuser'@'localhost' IDENTIFIED BY 'password';
FLUSH PRIVILEGES;
with password replaced by the password you want. Now you can exit MySQL.
Now we can set up the wiki.
Navigate to http://XXX.XXX.XXX.XX in your browser, with the XXXs replaced by your server’s IP. You should see this page:
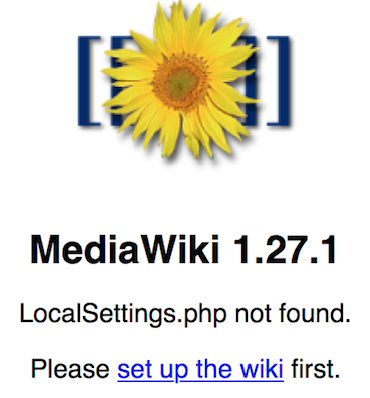
Click set up the wiki and follow the instructions. Most things should be self-explanatory; on the database settings section you will need to enter the settings from before:

You will also have to give your Wiki a name, and decide on on an administrator username and password. At this point you can say you’re “bored already and just install the wiki” and it will install!
4. Edit LocalSettings.php to allow file uploads and change the logo
The process generates a file called LocalSettings.php which downloads to your local machine. We need to move this to the server as it contains important settings that you need for customisation.
The easiest way is to open the file on your local machine in a text editor, copy the text, and then run
vi /var/www/html/LocalSettings.php
on the server, copy the text into the editor, then press ESC and type :wq to save and close the editor.
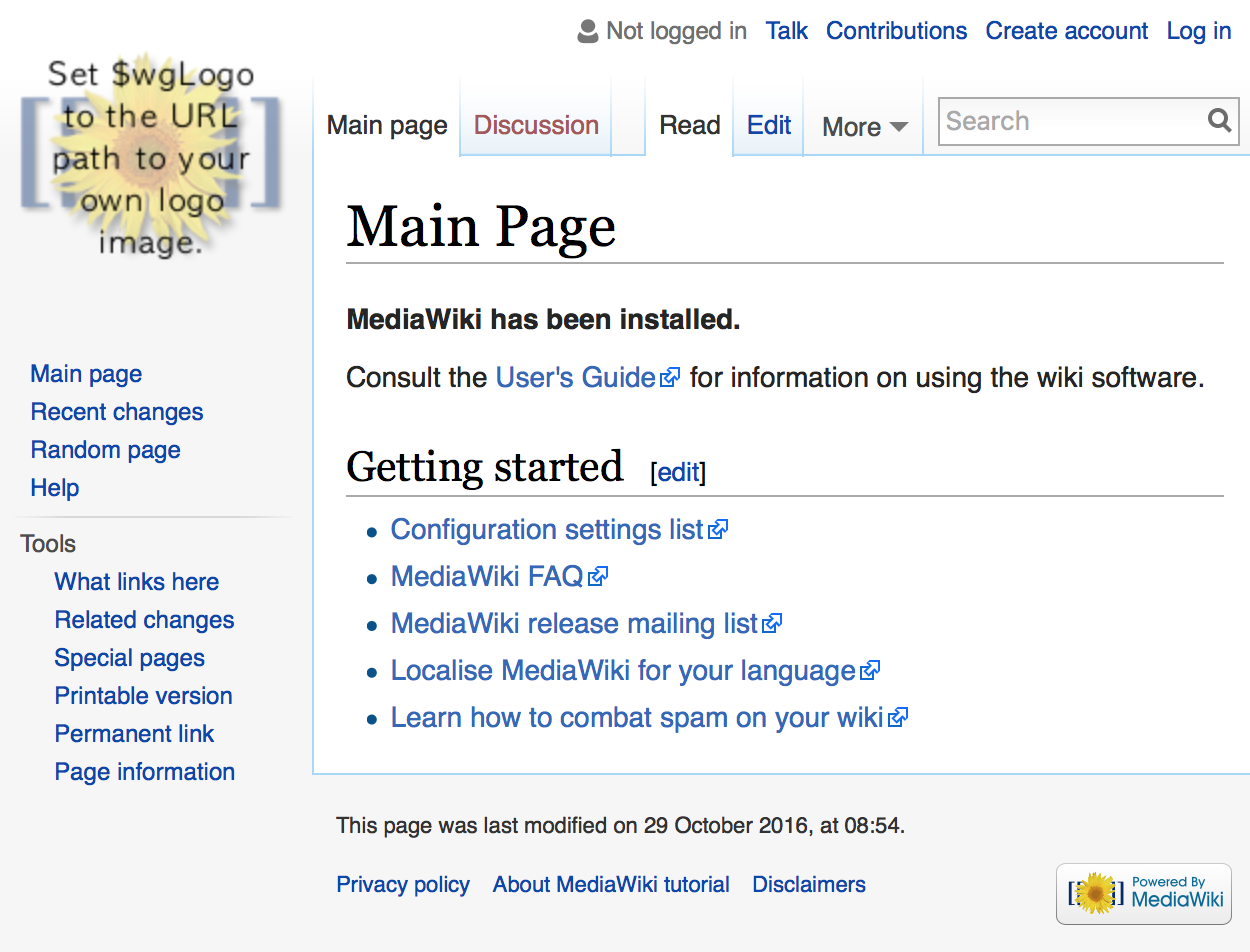
Now if you navigate to http://XXX.XXX.XXX.XXX/index.php/Main_Page, you should see the basic MediaWiki page:
There are two small changes you’re going to want to make to LocalSettings.php: the first is to change the variable $wgLogo to point to whichever image you want to use for your logo. You can put a file on the server and refer to its path, or upload an image to the web and refer to the URL. Note that the image must be exactly 160x160 pixels, and that instead of automatically resizing, MediaWiki just crops this from the top left corner of whichever image you use.
You’re also going to want to change the variable $wgEnableUploads to true so that you can upload files to the wiki, and run
sudo chown -R www-data:www-data images/
sudo chmod -R 755 /var/www/html/images/
to make sure image uploads will be able to write to the directory.
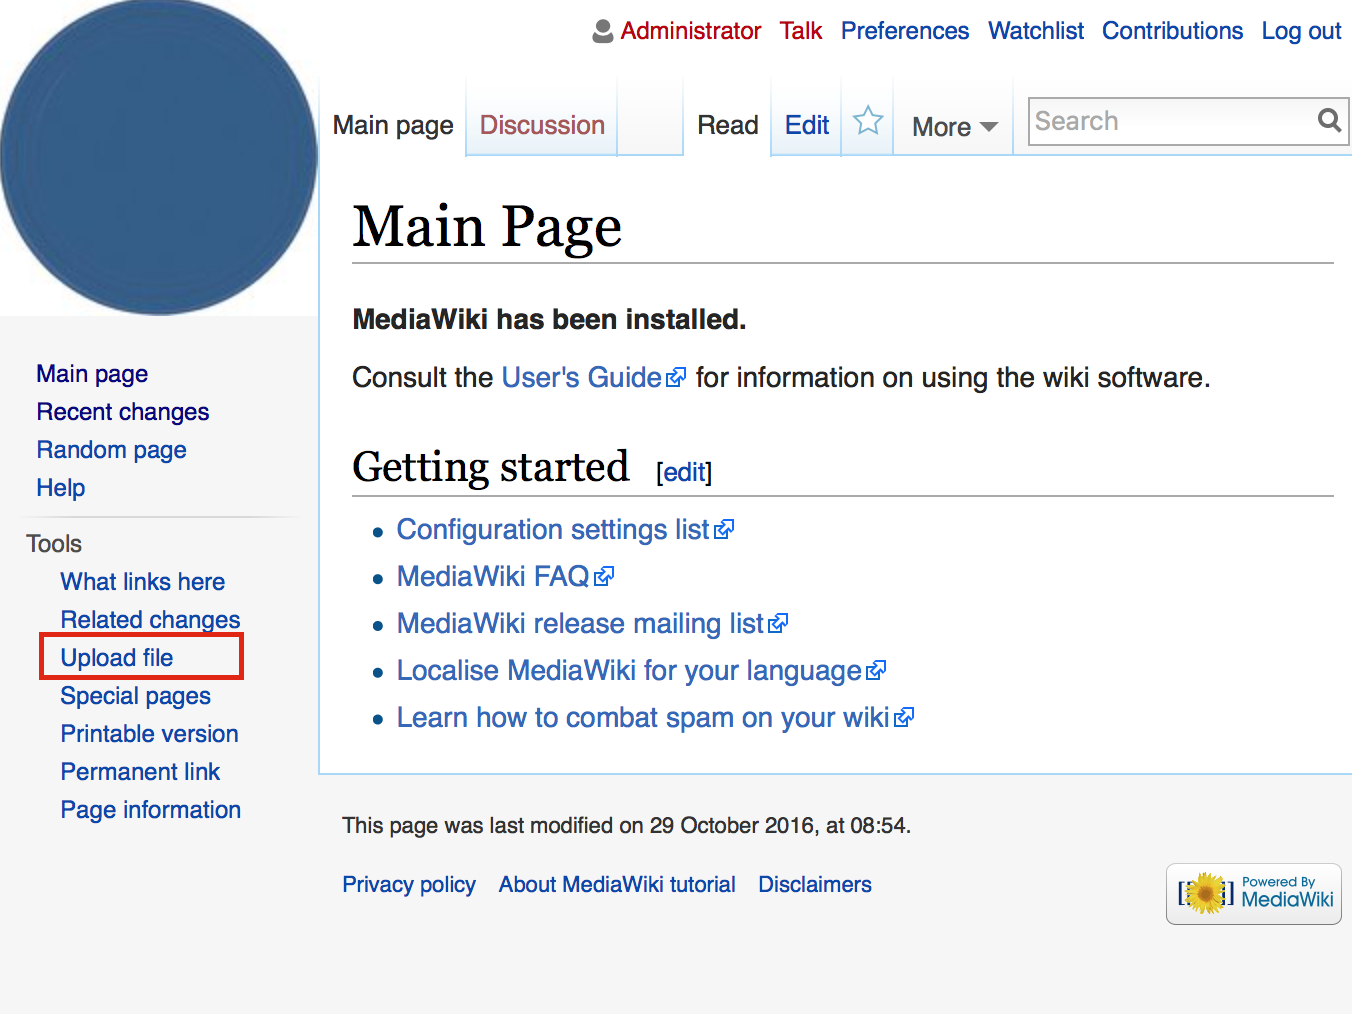
Now a logged-in user to your wiki should see the following; notice the non-standard logo and the Upload file option:
So we have the basic setup working. However this was the easy bit for me: the bit I had trouble with was creating interesting and useful templates like on Wikipedia; for example the navigation bars and boxes which are all over Wikipedia and extremely useful.
5. Installing and copying relevant extensions and pages
First we need to install the Scribunto extension:
cd /var/www/html/extensions
wget https://extdist.wmflabs.org/dist/extensions/Scribunto-REL1_27-4da5346.tar.gz
tar xvzf Scribunto-REL1_27-4da5346.tar.gz
and to edit LocalSettings.php (which is one directory up) to add the following two lines to the bottom:
require_once "$IP/extensions/Scribunto/Scribunto.php";
$wgScribuntoDefaultEngine = 'luastandalone';
We now need to install the ParserFunctions extension, again in the /extensions directory:
wget https://extdist.wmflabs.org/dist/extensions/ParserFunctions-REL1_27-d0a5d10.tar.gz
and to add the line
wfLoadExtension( 'ParserFunctions' );
to the bottom of LocalSettings.php.
Now we need to copy two files into our wiki. Navigate to https://en.wikipedia.org/w/index.php?title=MediaWiki:Common.css&action=edit, copy the source code, and then navigate to http://XXX.XXX.XXX.XXX/index.php/MediaWiki:Common.css and paste in the code from Wikipedia.
Do the same for https://en.wikipedia.org/w/index.php?title=MediaWiki:Common.js&action=edit.
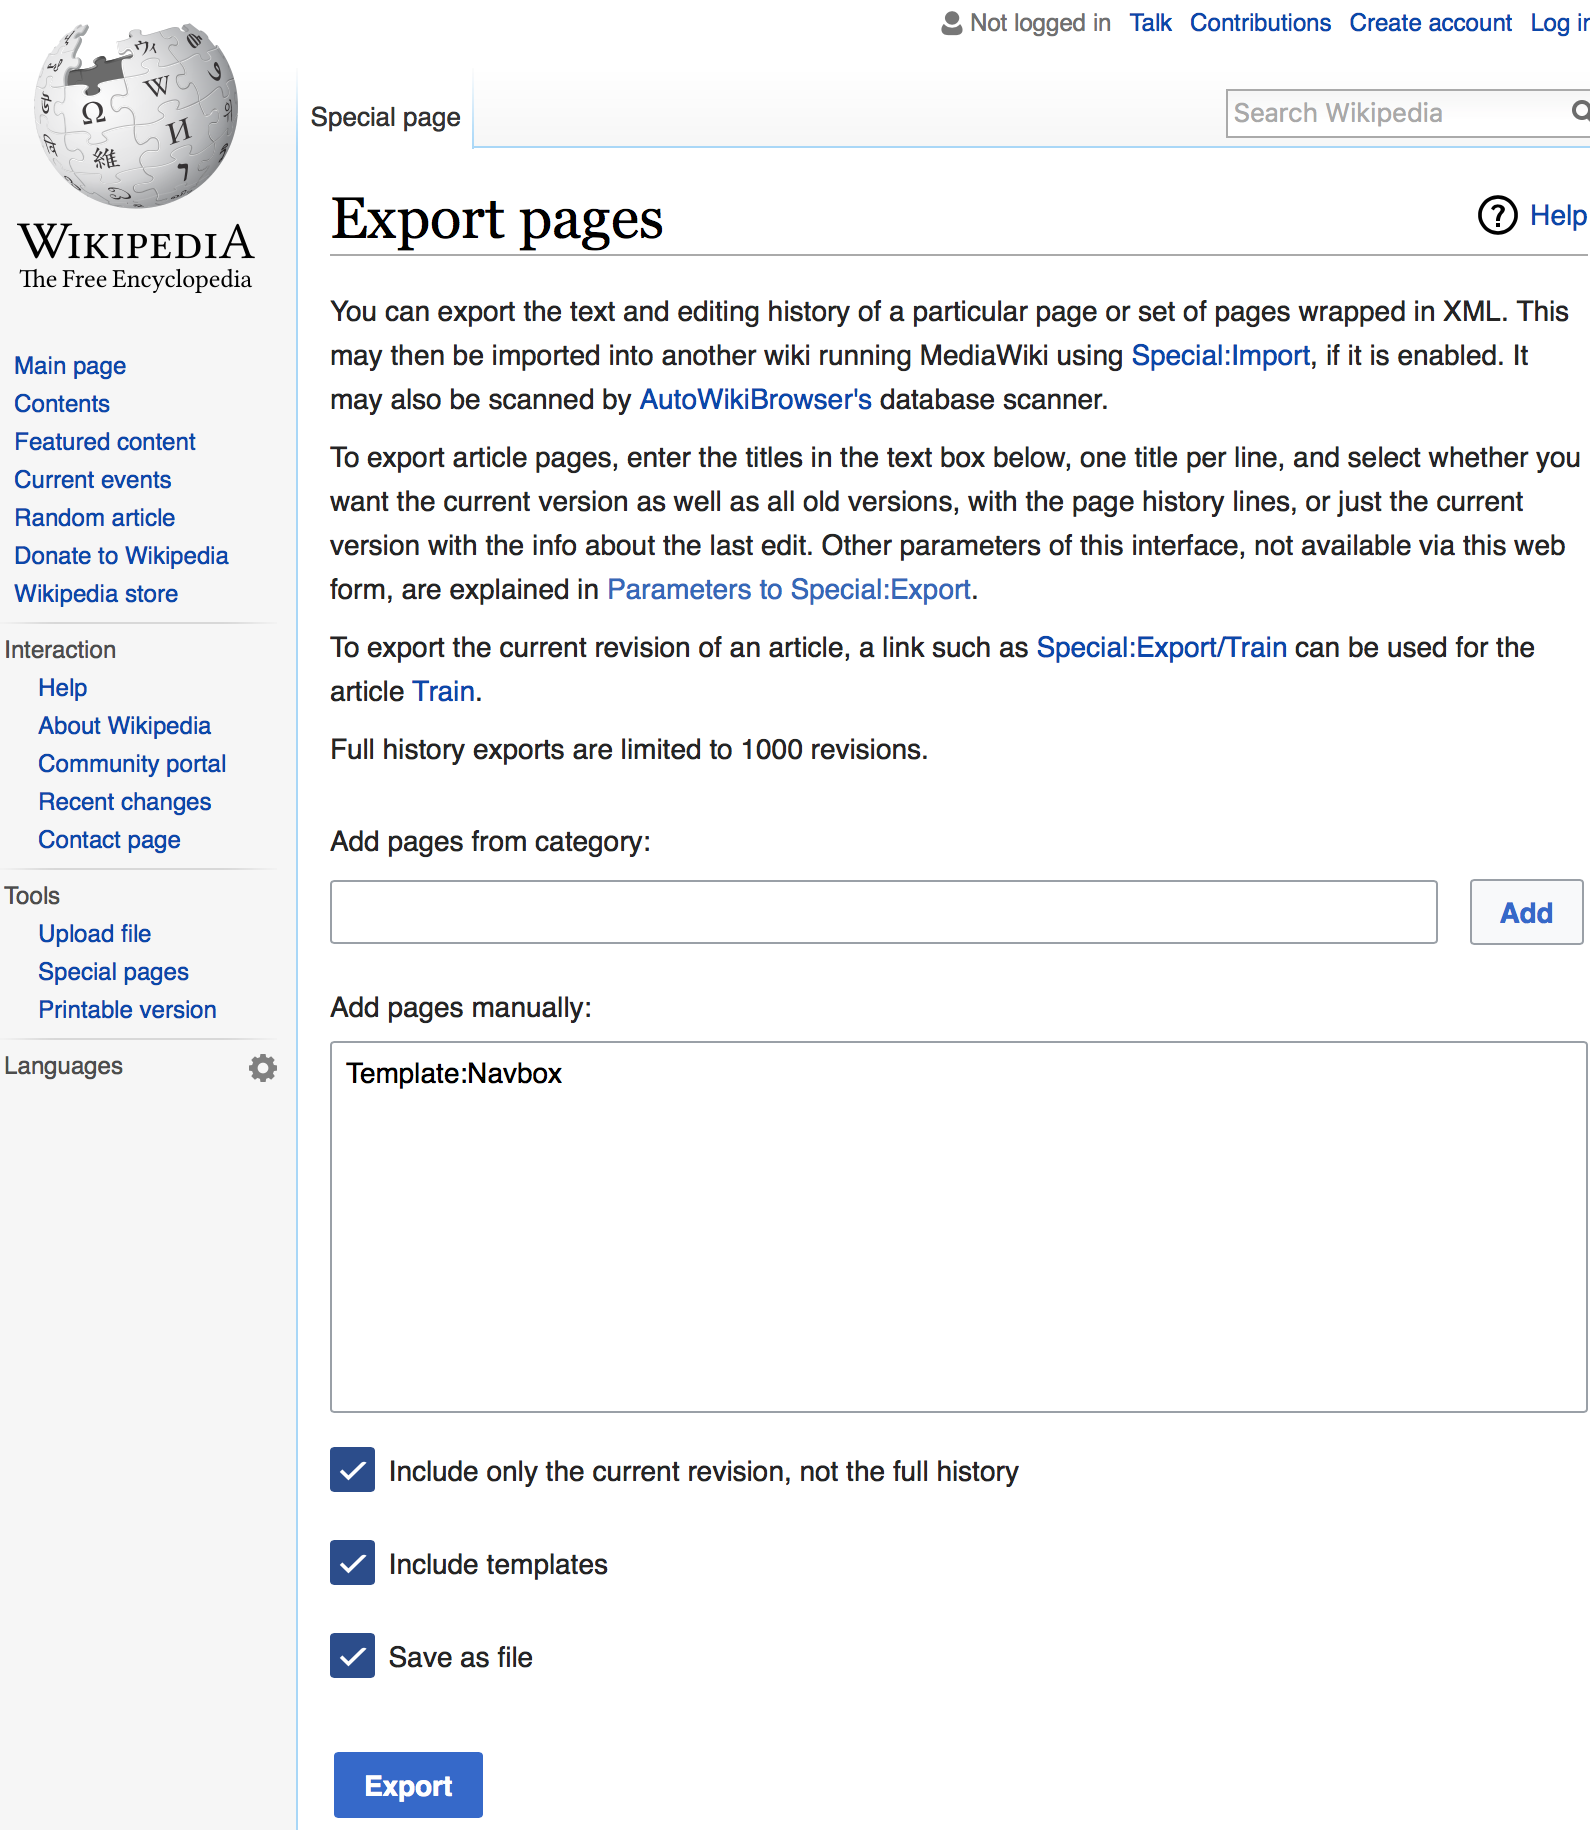
Finally, head to https://en.wikipedia.org/wiki/Special:Export and export the Navbox template, including all templates:
Now go to http://XXX.XXX.XXX.XXX/index.php/Special:Import, choose the file that Wikipedia just exported and import it to the Template namespace on your wiki.
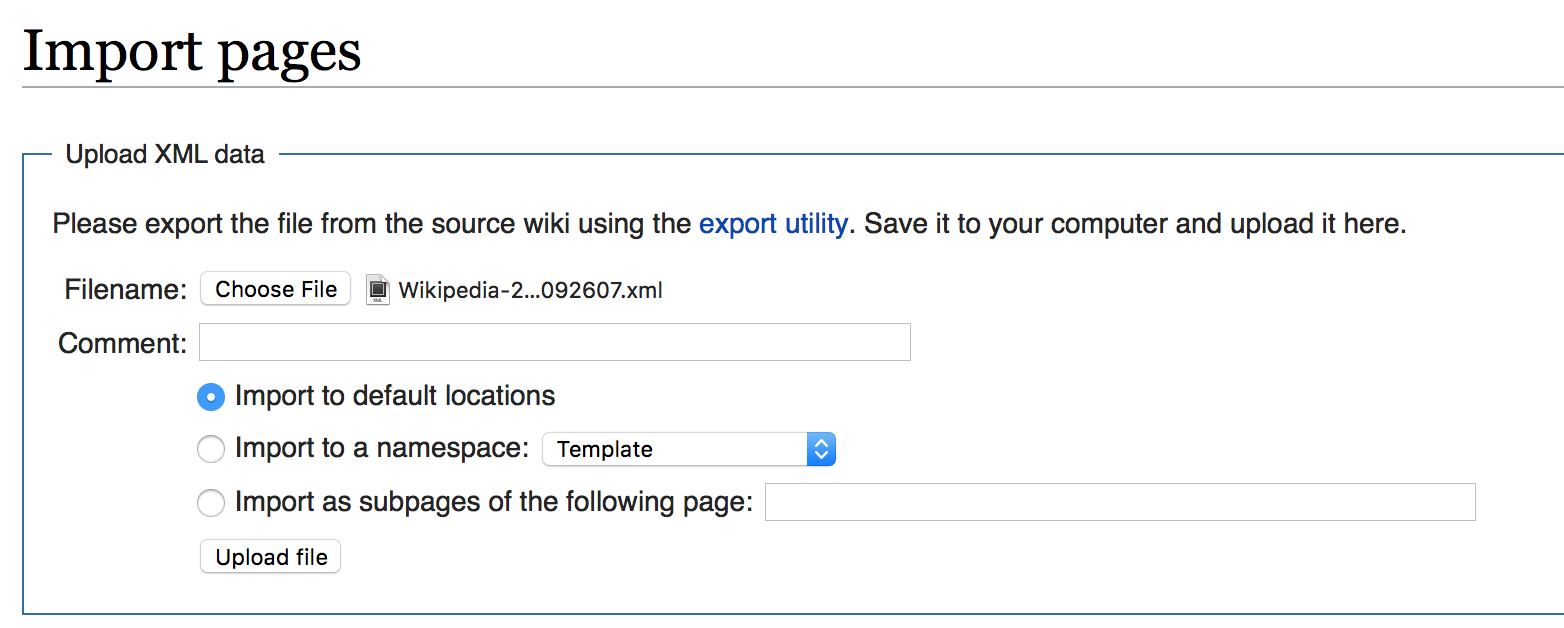
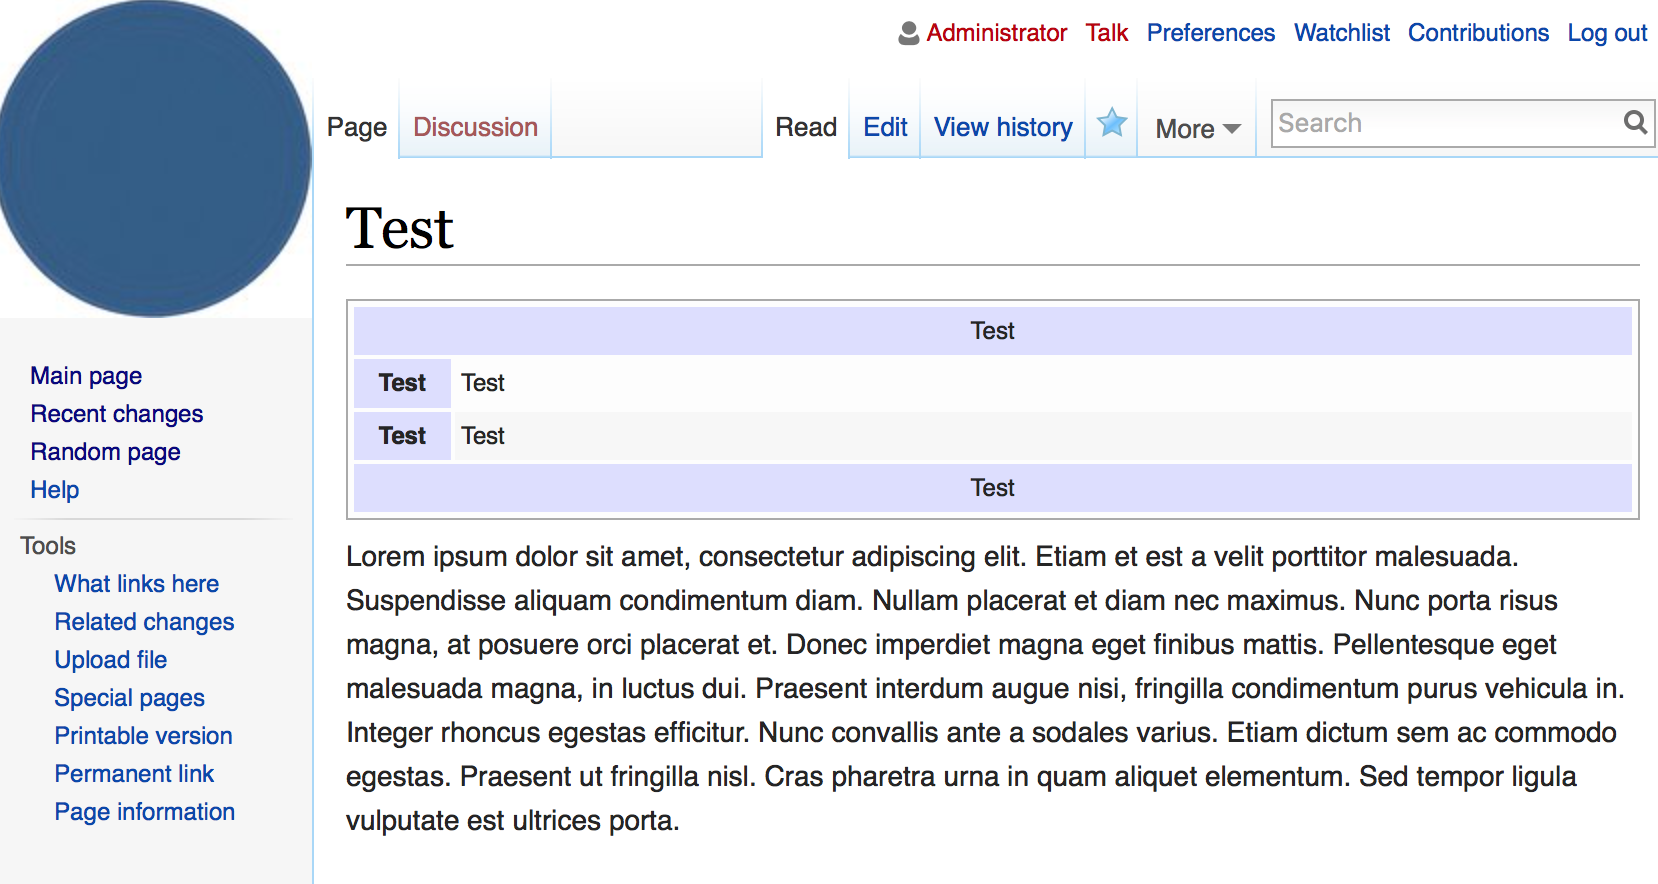
Upload the file, and now you should be able to include navigation bars!
For example, this source: produces this page on the wiki: